Description
Features:
Condition: 100% Brand New
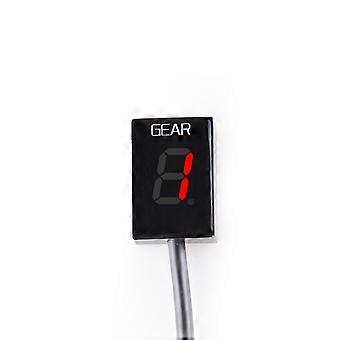
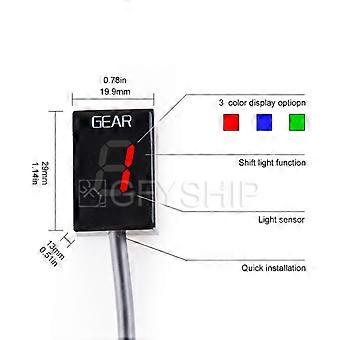
Color: Black
Light Color: Red/Blue/Green
1-6 Gear display
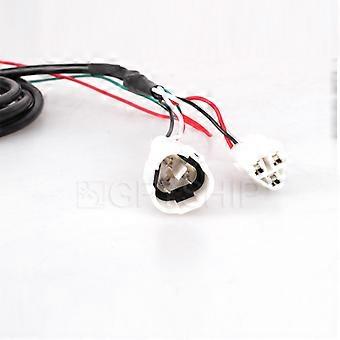
NOT Plug and Play. It is necessary to connect two additional wires after connecting the connectors. No need to break the line.
Note:
Do not attempt to install the product if you don’t have basic mechanical skills.
Fitment:
For Yamaha YZF-R6 1998-2016
For Yamaha YS250 Fazer ALL YEARS
For Yamaha YZF-R6S 2006-2009
For Yamaha YFZ450 ALL YEARS
For Yamaha YFM550 ALL YEARS
Instructions
:
1.
Remove the seat and locate the Speed Sensor coupler.
a. The Speed Sensor is usually located on the top of the gearbox and reads the revolution of the countershaft.
b. The 3-pole speed sensor coupler is situated 20-40 cm (8”-16”) away from sensor. The connector is usually accessible under the fuel tank or removing a side fairing. If the speedometer is driven off the front wheel, the sensor coupler is usually in the headlight bucket.
c. If in doubt, check the bike’s Service Manual or ask your dealer for the location of the Speed Sensor coupler.
Confirmation:
Separate the Speed Sensor coupler (you might need to use a small flathead screwdriver to get the coupler apart). Rotate the wheels while ignition is on.
The speedometer should indicate 0. If so, turn the ignition off and proceed to the next step. Otherwise, if the speedometer registers a speed other than 0, you have not disconnected the correct coupler and need to look again.
2.
After separating the Speed Sensor coupler, plug in both the male and female 3-pole GFY harness connectors. Make sure the connectors are fully seated.
3.
Find the 2-pole natural (or black) color plug of the Crankshaft position
sensor (Pickup coil). It has two wires coming from the crankcase: one is Gray, the other is usually Black/Blue - check the colors at both sides of the plug (if in doubt, do a temporary connection e.g. by using a thin needle to backprobe the connector pin). The 2-pole connector is usually under the fuel tank.
for XVS1100 models only: find and use the Orange (ignition coil wire).
Some Model Need To Find the 2-pole plug of the AC magneto (Crankshaft position sensor/Pickup coil). It has two wires coming from the crankcase: one is Red, the other is usually White
4.
On the wire identified in the previous step, peel off the black sleeve (tape) near the 2-pole plug, leaving about 3 cm (1.2”) of the wire exposed.
5.
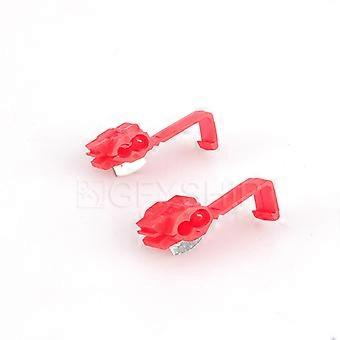
Connect the GFY Black/Green wire to this bike wire, using the Red wire tap connector supplied.
Usage: Place the unstripped bike wire inside the run channel. Close the side cover until latched. Cut off the excess length, then insert the unstripped tap wire (Black/Green) completely and check its position. Insert the blade (u-contact) and press down by finger pressure. Then, fully depress the u-contact with pliers. Close the hinged top cover until latched.
6.
Connect the GFY Red wire to a switched +12V wire, e.g. to the rear brake light switch, located under the fuel tank (2-pole brown or black connector, Brown wire at the main wiring harness side). Use the other Red wire tap connector supplied. You may also use e.g. the hot wire of the front parking light.
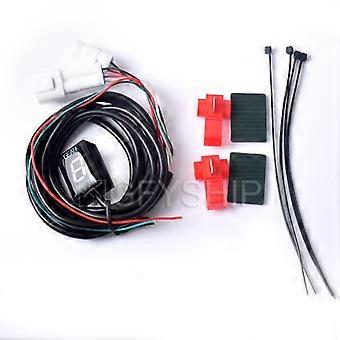
Package Include:
1 x
Gear Indicator
(
Contains installation instructions
)
-
Fruugo ID:
209517590-446684107
-
EAN:
928956853757
Product Safety Information
Please see the product safety information specific to this product outlined below
The following information is provided by the independent third-party retailer selling this product.
Product Safety Labels

Safety Warnings:
important Safety Instructions Read Before Use: Please read all instructions and safety warnings before using this product. Failure to follow these guidelines may result in injury, damage, or malfunction. General Warnings Intended Use: Use this product only for its intended purpose as described in the user manual. Supervision Required: This product is not intended for use by children or persons with reduced physical, sensory, or mental capabilities without supervision. Inspection Before Use: Check for any signs of damage or wear before use. Do not use if damaged. Usage Precautions Environment: Do not use in wet, damp, or flammable environments unless specified as safe for such conditions. Proper Operation: Follow all operating instructions carefully. Avoid improper handling or misuse. Power Source: Use only the recommended power supply or batteries. Do not exceed specified voltage or current ratings. Maintenance and Care Cleaning: Disconnect from power before cleaning. Use only manufacturer-recommended cleaning methods and solutions. Storage: Store in a cool, dry place away from direct sunlight and extreme temperatures. Repairs: Do not attempt to disassemble or repair the product. Contact authorized service personnel for assistance. Specific Warnings Avoid Hazards: Keep the product away from sharp objects, water, and heat sources. In Case of Malfunction: If the product malfunctions or exhibits unusual behavior, discontinue use immediately and contact customer support. Disposal Instructions Recycling: Dispose of the product in accordance with local electronic waste disposal and recycling guidelines. Battery Disposal: Follow specific regulations for the safe disposal of batteries if included.
Delivery & Returns
Dispatched within 24 hours
Shipping from China.
We do our best to ensure that the products that you order are delivered to you in full and according to your specifications. However, should you receive an incomplete order, or items different from the ones you ordered, or there is some other reason why you are not satisfied with the order, you may return the order, or any products included in the order, and receive a full refund for the items. View full return policy